Pages

Tuesday, January 29, 2013

Flour Tortillas


Today I went to make tacos for lunch and all we had were the crunchy taco shells-no tortillas. I think I'm the only one here who likes the shells, so I pulled out this recipe for tortillas I've been meaning to make. They take a bit of work- it's really a chore to roll them out because they are so elastic and want to keep snapping back into a smaller ball but in the end it was really worth it. They are so much better than store bought tortillas.  The Handsome Husband even said "Hey these look like real tortillas!"
Real Tortillas?
"Yeah like the ones at the store..."
Hmmm.


Flour Tortillas

2 cups All purpose flour
1 tsp Salt
1 1/2 tea Baking powder
2 tsp Vegetable oil
3/4 cWarm milk

Mix dry and wet separately, then together. Mix together well, then knead about 2-3 minutes. Form dough into a ball,  cover with a towel and let rest 20 minutes. Cut ball into 8 pieces (like a pizza) and roll each piece into a ball. Roll each ball out into a big circle. Spray a cast iron skillet with cooking spray and fry each tortilla about 45 seconds on each side or until dry and brown spots appear.

Monday, January 28, 2013

What Next?

Not such a  long time ago, women were championed as managers of their homes. To be called a housewife wasn't an insult, it was something to take pride in. It meant you worked hard to keep your family clean, fed, safe, nurtured, warm, clothed, and happy. Sure it was a lot of work without such modern conveniences and technology as we have today, but I would bet those women felt good about doing it, because they loved their families.
I think that for all the "progress" of the Womens' Rights Movement, we as the heirs of the generations of women who balked at wearing an apron over a dress, or "sacrificing" a career to stay home have really missed out on a whole way of life you just can't find in 9-5 job or in the aisles of any supermarket.
Did you know that when housewives were first introduced to Betty Crocker's line of boxed cake mixes (that were the "just add water" variety) they wouldn't buy them because they felt like they were cheating their families out of a home-baked dessert? So the company decided to produce mixes that needed an egg, and then housewives didn't feel so guilty about the convenience of using them.
Now everything is about convenience. Not that its always a bad thing, but what is it costing us in money, nutrition, and knowledge? And what is filling up that time we are supposedly saving? There are a lot of things I don't know how to do because they weren't ever necessary to learn. I always counted on someone else, in a factory or warehouse, or someplace far away to do them for me, and it was so easy just to pay for that so I didn't have to do it. But I've kind of grown tired of not knowing how to pronounce what is in the food we eat or not knowing where our clothes and toys come from and who made them.
That's really my hope ( one anyway) for this year- just to learn how to do the things my grandmothers did, and their mothers before them. I have learned so far that I love kneading dough by hand, and I like the feeling I get when I see my kids in clothes that I have made for them. I like sitting down to eat with my family and knowing I made something that didn't come from the freezer section, although it still happens occasionally). I love the history of my cast iron,  canning is fun and not so scary after all, and I am excited to learn how to garden and actually grow things we need.
There are so many things new things I want to learn this year- how to knit, make soap, sew by hand, make cheese, make clothes for boys, bake a white bread we can use all the time, make a quilt, save seeds.. I'm really excited about it all. January's almost over, I will keep adding things I learn to make at home instead of store-bought, but what should February's main topic be? Any suggestions?

Dog Treats

For awhile in high school, I worked at a little boutique-type shop that made and sold dog biscuits. All morning long, 5 or 6 of us would mix dough with giant industrial size mixers, roll it out and cut biscuits by hand. It sounds tedious but it was actually really fun. We made lots of different kinds, of all sizes and shapes.
All-natural dog treats can cost quite a bit, but here are some you can make at home that hardly cost anything at all. And they are completely safe for little humans, just in case they think they need a treat too...


Dog Treats from Fake-It-Frugal
Ingredients:2 Tablespoons Vegetable Oil
1/2 Cup Peanut Butter
1 Cup Water
3 Cups Flour

Mix everything together until dough forms a ball. If you are using a stand mixer, use the dough hook and it will mix up really fast. Roll out dough onto surface ( doesn't need to be floured, they won't stick) and cut into strips with a knife, then across in the size you want, or use mini cookie cutters ( or regular size if you really, really love your dog) Bake in oven at 350 for 20 minutes. Divide into a week's worth of treats and store the excess in the freezer.

Friday, January 25, 2013

Cinnamon Rolls #1 w/ Cream Cheese Icing


These cinnamon rolls come from The Husband's Great Aunt Nadine. She is one of my favorite aunts, and these are quite possibly my favorite cinnamon rolls. They rely on a yellow cake mix and about a total of an hour's rise. They are best if you make them the night before and serve them in the morning, That way the icing can fully infiltrate the rolls. I put these in 2 8x8 square pans, bake one, and freeze one after shaping the rolls. The icing freezes well too.
 I made a pan of these and left them out last night.The Handsome Husband ate 3 by himself when he got home this morning. And he never does that. They are just that good. I think they taste a little like those cinnamon rolls you buy in the rectangle package with the white icing that peels off. I don't know what they are called, but I'm sure these are much better for you than those ones.


Great Aunt Nadine's Cinnamon Rolls

Proof 2 packages (4 1/2 tsp) yeast in 2 1/2 cups warm water.

Add one box yellow cake mix and stir well.

Add in 5 cups of flour, mix together thoroughly, and let rise until double in size.

Punch down dough and turn out onto a floured surface. Knead a little to bring it all together. Roll out until about 1/2 inch or so thick.

Spread with melted butter, then cinnamon and sugar. Roll up tightly, cut, and place in pan. Let rise again for about 20 minutes and bake at 350. Pour icing over the rolls, (let icing glaze over and dry) cover, and let sit overnight.


Cream Cheese Icing
1/2 cup softened butter
1/4 cup softened cream cheese
1/2 tsp vanilla
1/2 cups powdered sugar
1/8 tsp salt

Mix all together until fluffy.

Thursday, January 24, 2013

Enchilada Sauce

One of HH's favorite meals is chicken enchiladas. I always seem to forget to get enchilada sauce at the store though. It never occurred to me that it would be possible to make it at home. Here is a really quick and easy way to make it yourself. It looks, smells, and tastes just like the store bought version, and is much cheaper. This made enough for me to freeze two portions and use a third for dinner.

Red Enchilada Sauce
{Budget Bytes}

Total Recipe cost: $0.80
Recipe Yield: 2 cups
Prep time: 0 min. Cook time: 5-10 min. Total: 5-10 min.


INGREDIENTSCOST
2 Tbspvegetable oil$0.10
2 Tbspall-purpose flour$0.02
2 Tbspchili powder$0.30
2 cupswater$0.00
3 oz.tomato paste$0.27
1/2 tspcumin$0.03
1/2 tspgarlic powder$0.03
1/4 tspcayenne pepper$0.02
3/4 tspsalt$0.03
TOTAL$0.80


STEP 1: Add the vegetable oil, flour, and chili powder to a medium pot. Turn the heat on to medium and whisk the ingredients together. Continue to whisk as the mixture begins to bubble. Whisk and cook the mixture for one minute once it begins bubbling.

STEP 2: After one minute, whisk in the water, tomato paste, cumin, garlic powder, and cayenne pepper until smooth. Allow the sauce to come up to a simmer. Once it reaches a simmer it will begin to thicken slightly.

STEP 3: Starting with a 1/2 teaspoon, add salt to taste. I used about 3/4 teaspoon total. The sauce is now ready to use!

Wednesday, January 23, 2013

French Baguettes {and Sausage Bread}


This blog originated with my desire to learn how to make bread myself. I love bread of all kinds. So when I (used to) go grocery shopping, I would of course stop by the bakery and pick up a loaf or two of french bread.Its so versatile. But they always seemed to be very tough or stale and not very appetizing at all. And the price continued to rise for what appeared to be a smaller portion than before.
So this blog was started as a way to keep all these recipes I wanted to teach myself safe and also share them with anyone else who might like to learn some new tricks. In uncertain times, its always good to know how to do things yourself. Not that we are destitute mind you, but a penny saved is a penny earned, right?

Today I had no idea what to make for lunch. No. Clue. That hasn't happened since I started my Homemade Resolution at the beginning of this month. I finally decided on Sausage Bread because we had some leftover cooked sausage and a tiny bit of cheddar and pretty much nothing else in the fridge. Sausage Bread is The Handsome Husbands' family's favorite treat. They only eat it at Christmas and it's very, very good. But, they make it with Pillsbury French Loaf dough you get in the can. Which was certainly not in my fridge this morning.


So I used this recipe for crusty french baguettes I found the other day. This is actually the second time I've tried it and this time I nailed it. Crusty on the outside, soft  and not doughy on the inside. I made 2 smallish baguettes and one large loaf of Sausage Bread with this recipe, which didn't last long at all.

Quick & Crusty French Baguettes
  • 2 cups very warm water
  • 1 packet yeast
  • 2 tablespoons sugar
  • 1 1/2 teaspoon salt
  • 3-4 cups flour
Preheat the oven to 425 degrees.  In a large bowl, whisk together the warm water, yeast, and sugar.  Set the bowl on top of your preheating oven for ten minutes.  Stir in the salt and add the flour a half-cup at a time, until the dough becomes soft but not sticky.  Knead the dough until elastic.
Cut the dough into four even pieces.  Roll each of them into four long, thin ropes.  Twist together two of the ropes to form one loaf.  Twist the other two ropes together to form a second loaf.  Transfer both onto a large baking sheet lined with parchment paper.
You can now bake the loaf right away (if you’re in a hurry) or allow it to rise for an additional 15-30 minutes on top of your warm oven.

Bake for about 25-30 minutes or until bread is golden brown on top and sounds hollow when you tap it.

I also did an egg wash to help it brown up a little and to make it a little more crunchy on top.

And here is the recipe for Sausage Bread:

Divide the dough in two parts. You will only need one for this, it makes a large loaf. Cut the dough in half.for the top and bottom.


 Spread the bottom part out on a cookie sheet and press with fingers until about 3 or so inches wide, and as long as your sheet. Spread out cooked sausage ( regular pork sausage, bacon and pork, or half and half) over dough and press lightly into dough to keep it from falling out. Sprinkle some cheddar cheese on top, then some more sausage. Lay the top dough over and pinch sides to seal.


Bake as directed above.

Waffle Mix


Last night,  Lovely wanted waffles for dinner. I already had something planned, but I told her we could have them for breakfast. So before I went to bed, I searched pinterest for a good waffle mix from scratch and this is what I found. These are by far THE BEST waffles I have ever had. They taste like french toast. My kids said they taste like marshmallows, and that they are "gooder than the other kind", (the pancake and waffle mix kind we normally have) and I wholeheartedly agree. I made up 4 mixes tonight to have on hand.
These cook up really quick in the waffle iron, and are slightly crunchy on the outside, very soft on the inside. They freeze well; just thaw and stick in the toaster for a minute to reheat.
The original recipe calls for blueberries, but we didn't have any so I made some plain and some with chocolate chips.
I wonder if it would work for pancakes as well. Only one way to find out...

Here is the recipe, from One Hundred Dollars A Month, my new favorite blog.

Ingredients
2 cups flour
1 tablespoon baking powder
1 teaspoon baking soda
1/2 teaspoon salt
1/2 teaspoon cinnamon
4 eggs
2 cups buttermilk
1/2 cup butter, melted
1 /2 cup fresh or frozen blueberries
extra blueberries to sprinkle on top
powered sugar and syrup

Directions
Mix the wet ingredients with the dry.  Cook on a lightly greased waffle iron.  Sprinkle fresh berries and  blueberries over the top.

Tuesday, January 22, 2013

Our Big Adventure


This year we are putting in a garden. For real this time.
We've tried before but for some reason our excuses were bigger than our willpower. Not this year!
In my commitment to Homemade Goodness, I am determined to grow at least some of our food to can, dehydrate, and of course, eat fresh. Here's what's on the list:

Heirloom tomatoes
Potatoes
Carrots
Green Beans
Bell Peppers
Hot Peppers
Onions
Green Onions
Strawberries
Spinach
Lettuce
Okra
Pumpkins

And I'm going to plant an herb garden as well. Contents to be determined later...


All our seeds come from Baker Creek. They have all Heirloom, non GMO seeds.

Trash to Treasure: Green Onions


Did you know you can grow green onions from the bulbs you would normally throw away? I have garlic(on the left) and onions on my windowsill and both are doing very well.  I was pretty skeptical, but today I "harvested" about 1/3 cup, just about what I could buy at the store. I left the stalks in the jar to see how much more I can get from them. I froze the onions in a baby food jar for later.
I've read that you can cut off the garlic stems just like the onions and use them in place of garlice cloves, or you can plant the cloves in soil, cut off the green tops, and that the clove will use its energy to grow a new head of garlic. Pretty interesting. I will have to get some soil and see if it's true.

Not bad for free. And they taste great.


Monday, January 21, 2013

Pizza Dough

Yesterday was a weird day. My lovely little girl was sick so we and The Babe stayed home while The Husband took the other boys to church. We got Mexican for lunch, and I wasn't sure what to make for dinner since TH had to go into work last night. I knew I wanted to make something from scratch though. I really enjoy cooking now more than before. I love making real food from basically nothing, from just flour and sugar and salt.

I did a quick google search, "baking from scratch" and found this cute blog.

Her recipe for pizza dough sounded easy and fast- only about a 30 min rise. I could do that. I ended up using half the dough for our dinner, and freezing the other half. This made a really thin, crispy crust that was so good. I've never been able to make a crispy crust. I was really happy how this turned out.Next time I will press it out instead of using the rolling pin to see how it turns out as a thicker crust.

*I also baked the crust for about 6 minutes or so before adding sauce and toppings, just to see what would happen. I think that may have helped it to be crispier.

Never Fail Pizza Dough

2 cups plain flour
1 cup of warm water
1 sachet of instant yeast
1 teaspoon sugar

Place yeast and sugar into a large bowl, pour warm water over and allow to sit in a warm place for around half an hour, or until yeast mixture has doubled or tripled in size. Add flour and mix with an electric mixer {dough hook attached} or slowly by hand or until combined and the dough starts to form a ball. Allow dough to rise in the bowl covered with a clean tea towel in a warm spot for around half an hour {more is better}. Scoop dough out onto a well floured bench top and knead into a smooth ball, divide into sections and roll out thinly. Bake at med-high until crust is golden and cheese is melted.
*I always turn my oven to warm and let the rise happen in there. In our old, drafty house, it's hard to get anything to raise otherwise. 

Confession...


I bought eggs. 2 dozen actually.
I tried making brownies without eggs, with applesauce instead, but it turned into a bubbling, oily, black mess. 
Live and learn.
So, I guess I will just make brownies when I have eggs. I bet it would work instead of the oil, though.
Anyway, Im thinking I need to redo my challenge. I want to cut down my grocery budget anyway, and making things from scratch will definitely help. So here's what I'm thinking.
I will post over in the sidebar my total allotted grocery budget by week and by month. Im going to try for half my normal budget for the next 4 weeks. Usually it's about $500 a month for the 6 of us. So for the next month ( starting yesterday when I got the eggs) I will have $62.50 a week to spend on food and household products- whatever I can't make myself. I think this is way more doable and encouraging to me than telling myself I can't spend any money for x amount of time, and then feeling like I failed the first time I need something.
I will report on what I spend and what is left for that week and put any leftover change in a collection for our vacation later in the Spring. Sound good? Maybe it will encourage someone else to learn this stuff alongside me and save money and learn new skills too.

Sunday, January 20, 2013

Brownie Mix

I've never made homemade brownies, I think the idea always intimidated me for some reason. It seemed like alot of work for not being sure how they would turn out. But this recipe from Fake-It-Frugal for "Fake Betty Crocker Brownies" seemed so easy I had to try it, given my new "Make-Do Challenge."
Some days we all just need a little chocolate, and brownies are the perfect pick-me-up.
I used 2 of my remaining 5 eggs on these, and I'd say it was definitely worth it. These taste just like the real thing. Next time however , I will try them with applesauce and baking powder as a substitute for the eggs, or maybe some flaxseed.

Fake-It-Frugal's Fake Betty Crocker Brownies

1 Cup Sugar
1/2 Cup Flour
1/3 Cup Cocoa
1/4 teaspoon Salt
1/4 teaspoon Baking Powder
2 eggs
1/2 c vegetable oil
1 tsp vanilla

mix all together and bake at 350 about 20-25 minutes

These are very easy to make a few mixes for your pantry- just pour the dry ingredients in a ziploc bag and label.

Homemade All-Purpose Cleaner

This is a really easy, quick, and inexpensive cleaner that works well and is safe around kids. I use it everywhere- in the kitchen, in the bathroom, on windows and mirrors ( it doesn't leave streaks or cloudiness).
There are lots of store-bought cleaners out there that work well, and some that I really like, but I don't feel comfortable having them around where my kids could get into them. Plus, they can really cut into the grocery budget.
I can make up a couple bottles of this one in no time and it stores very well.

Homemade All-Purpose Cleaner:

Water
Regular (white/distilled) vinegar
Rubbing alcohol

Fill a spray bottle about 1/2 full of water. (Doesn't have to be exact)

Fill the rest of the bottle with half vinegar and half alcohol.

That's it. So easy.

*You could also infuse the vinegar(for a more pleasant smell) by filling a clean jar with vinegar and adding apple, orange, etc peels and letting it set for 3-4 days or even longer, then straining out the peels, and using that instead of plain vinegar. I don't mind the smell of the vinegar, it seems to go away as soon as the cleaner dries, which is pretty fast.

Saturday, January 19, 2013

Fruit Snacks

Something that my kids love, but which I rarely buy are fruit snacks. For a few different reasons.

1. For all the shiny, colored packaging, there really isn't a whole lot of product in there.
2. Most fruit snacks taste like chemical versions of fruit.
3. They can be pretty expensive.

But homemade fruit snacks are incredibly easy to make, which is great, because they won't last long. My kids (and The Husband, and my brother) love these.


Homemade Fruitsnacks

1 (3 oz) package jello
2 (.25 oz) envelopes unflavored gelatin- I use Knox because it's the only kind I've been able to find. There are 4 envelopes to a box.
1/3 c. water
Mix all together and heat over medium until dissolved. Carefully pour into candy molds or an ice cube tray. Let cool until pliable but dry- about 15-20 minutes. Peel out of molds and enjoy. These do not need to be kept in the fridge.


Friday, January 18, 2013

Why Keep a Pantry?


Do you keep a pantry? If so, why?

There are many reasons why it's a good idea to have a well- stocked pantry in your home, even if your favorite grocery store is just up the street, is open all night, and gives you great discounts and perks.

*For one, having what you need on hand saves you a trip to the store,which saves gas, time,and money.
I hate being in the middle of making something ( like chili dogs) and realizing we are out of buns. I have to go to the store and chances are I will end up walking child-less up and down aisles that have nothing to do with buns, and everything to do with magazines and chocolate, and wind up at the check-out with an armload of things I don't need. It's such a relief to know I can walk into my pantry and pull out what I need when I need it. Making a meal plan beforehand helps me to know when I will need what and I can plan my grocery list around what"s available in my pantry and freezer.

*In our church family, someone is always having a baby. We love babies. And we love bringing food to their new families. I can be a blessing to someone else by having ingredients on hand for a good meal or two to give away. The same idea applies to donating to the local food pantry, an unexpected dinner guest, and my mother-in-law asking me to bring a side dish for Sunday lunch at the last minute.

* FEMA recommends a 3-day supply of food for emergencies. The Red Cross recommends a 2-week supply for sheltering in-home.  The weather plays a crucial part in our country's food delivery system. Hurricanes, tornadoes, floods, earthquakes, and snowstorms can disrupt the chain of delivery with no warning. Most stores recieve daily deliveries and don't keep more than a couple days worth of food in their storage rooms anymore. With an approaching storm, if all your neighbors rush to the store to stock up, it may be hard to get what you need before its gone. Not to mention long lines, crying babies, and grouchy grown-ups.
A slightly different scenario would not be pleasant to think of, but might be just as important. With political, social and economic uncertainty these days, a well-stocked pantry would provide a sense of peace and security if something "man-made" should happen that would disrupt the food supply. Just think about this: if people rush out in a frenzy when they think their guns will disappear, how will they react when they think their food will? I for one, would not want to be out trying to figure out what to feed my family for an extended amount of time in the middle of a national crisis. It would be too unnerving and possibly unsafe. I would much rather have the basic supplies and know-how to get by for awhile during the initial confusion and mayhem, no matter the scale. And remember- the food at the store travels hundreds of miles, even coming in from different countries, so the "man-made" incident wouldn't even have to be local.

*A well-supplied pantry would be helpful in the event of job loss. Being able to provide for your family's needs while figuring out what to do next would be a hedge against the burden of panic and uncertainty.

Not so long ago, families put up food from their gardens and "laid in" supplies for winter, hard times, or just 'in case." Not many people do that now, prefering to shop weekly or daily for what they need. And some take it to the extreme as in the show Doomsday Preppers. A good medium would be to make a list of 2-3 weeks worth of meals your family likes and plan your shopping to stock up on those ingredients. Look for sales and buy a couple extra of boxes of cereal or cans of veggies next time you go out. Before you know it, your shelves will be a little fuller and you'll have a little more peace of mind about providing for your family.

The "Make-Do" Challenge

Some of my goals for this blog, besides just being a placeholder for all the recipes and tutorials I need to keep track of, are to chronicle a year of learning how to make everyday things from scratch, how to use what we have at home instead of running out to the store, and how to save money on what we do buy.

Today I'm challenging myself to make do with what we have at home for...hm...lets say 2 weeks just to start. I usually go grocery shopping every two weeks and I went last Saturday, so that pushes me an extra week out. This will really force encourage me to learn to make some things I would normally buy.

Times like these are when it's a good idea to have a stocked pantry. We'll talk more about that later.

 *I'm not sure what to do about milk. We have one gallon now, and the husband doesn"t like powdered milk. 3 weeks seems a long time to stretch a gallon. Oh well, we will see. It's part of the fun, right?

Thursday, January 17, 2013

Homemade French Fries

One thing I miss about not eating out so much is the french fries. I love french fries. Red Robin has some great ones, and Arby's curly fries are very good. And we can't forget the "world's best" - McDonalds. For some reason the store bought fries never seem to compare to the "real" ones, although Oreida's Fast Food Fries come close. But I don't like spending almost $5 on a bag that will last maybe 2 meals in our house, and only 1 if we have guests. Aldi's usually has their 10lb and 20lb bags of potatoes for .99 so I can make a lot of these very cheaply.
To make really good french fries, all you really need are potatoes, water, and oil. Plus whatever seasonings you like. They are very easy to make and I always get that nice little feeling of accomplishing some great task when I stack all those bags in the freezer.
Scrub and peel the potatoes. Cut to desired thickness longways.Let sit covered with water for at least 24 hours. However, the longer the better. I usually do 2 days. This helps leach the starch from the potatoes, and in the end will make them softer on the inside, crunchier on the outside. When you are ready to fry them, pour off the water and let them come to about room temperature. Get your oil ready. Peanut oil burns hotter and faster but you can use canola or vegetable oil just as well. 

 Get your tongs and grab a few fries. Lower them gently into the hot oil. ( to test oil, either use a thermometer or stick a fry all the way down to the bottom and if it sizzles, its ready) These will be your test fries. You don't want the fries to get too brown too quickly because they probably wont be done in the middle. And you dont want them to take too long to get brown. It's a delicate balance. It should take about about 1- 1 1/2 minutes, maybe 2 to get a nice general golden brown to the bunch. Of course some may be darker or lighter than others, but overall, they should look golden brown.
Grab them up with the tongs and spread them out on a wire rack so the oil drips off.
When they have cooled off, scoop them up into whatever size portions work for your family and freeze. To use, just spread out on a cookie sheet and season. Bake at 425 until hot throughout.

Tuesday, January 15, 2013

Buttermilk Biscuits

One of my first quests in this new year of making a home by hand is to start in the kitchen, where I find myself for a good portion of the day. It is where we cook, eat, play, craft, and homeschool.
I am not a morning person. Somedays, all I want to do is go back to bed, especially if the baby has kept me up more than usual the night before. So breakfast, while it seems, to my kids at least, to be the reason for waking up early, is not something I often anticipate. The usual suspects at the table for the morning feast are cereal, poptarts, muffins, or waffles. In my defense, they are at least from a mix kind of waffles, but thats another post.
This is about slowing down, remember? And learning to do things differently. About living a simpler life and nurturing my family.
This is about biscuits.

Warm, soft, homemade buttermilk biscuits. With butter and honey and strawberry jam... (doesn't it just make your mouth water?)
It is so easy to grab a can of Grands! biscuits at the store. So easy to bang the can on the counter, lay out the little disks of dough and wait 15-18 minutes for hot biscuits. But when I do that, I have only paid for the excuse to not learn to make something better, something that I can be proud of and know my family will enjoy and maybe even look forward too. And when they are gone, they are gone. And there are only about 10 or so in there anyway I believe.
Grands are good, but these biscuits are better.
This recipe is from another blogger, it is not my own creation, but it is  forevermore my homemade biscuit recipe.


Southern-Style Buttermilk Biscuits

4 c. flour
2 T. baking powder
1/4 t. baking soda
2 t. salt
4 T. sugar
1/2 c. (one stick) butter, cold, cubed
1 1/2 c. buttermilk
4 T. butter, melted

Preheat the oven to 475 degrees.  

Mix together the dry ingredients.
Cut in butter. I like to use my fingers to scrunch it all up. That way I don't miss any chunks.
Carefully pour in the buttermilk and mix well.

Turn out onto a floured surface, it's ok if not everything is incorporated with the dough, just try to work it all in when you knead.
Knead lightly about 15-20 times, until dough holds together easily. Be careful not to work it too much or the biscuits wont be as light. Press the dough outward by hand- don't use a roling pin. I usually cut my biscuits at about 3/4 inch high. They will double in the oven. Use a biscuit cutter or the rim of a glass to cut the biscuits. Press straight down, don't twist.

Roll up the scraps together, press and cut.

Lay out on an oiled cookie sheet or, even better, a cast iron pan. Bake about 8-12 minutes depending on your oven, or until tops are golden brown and dry.

Remove from the oven and brush with the remaining butter. 


I usually double this recipe and freeze a good portion of the uncooked, cut-out biscuits on a cookie sheet, then throw them in a gallon size freezer bag. When I need a few, I pop them right in the hot stove and they bake up just like fresh ones.

Sunday, January 13, 2013

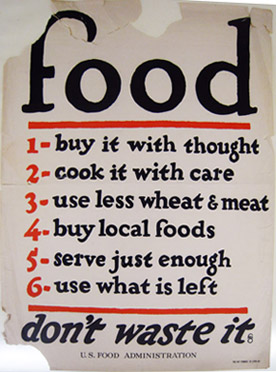
Don't Waste It


This poster from 1917 is just as relevant today.
In the midst of economic uncertainty, it is important to conserve our hard earned money, and to learn to spend it wisely. The recent governmental regulations have made a bit of a dent in our single-income paycheck, as is true for many ,many Americans. One of my hopes for this blog is to give other families a sense of peace in tough economic times. There is much we can do to alleviate the pinch of tightening home budgets.
This month I want to focus on home-made alternatives to common store bought items, as well as stocking up the pantry, something that seems to almost be a thing of the past in a society where we can get nearly anything we want, right up the street at the store.

But for now, some timeless tips on how to live frugally with food:
1. Buy it with thought
A great home-cooked meal doesn't have to be a fancy four-course feast. But it does take some planning. Making a meal plan a few days before you go to the store is a good start to feeding your family well on a budget. Make a note of what you have already at home. Also, think about where the things on your list are coming from, what is in them, and if you could possibly make them yourself. And see if you could buy it in bulk, or at least a few at a time-that way you can start building up a supply and have it on hand the next time you need it.

2. Cook it with care
My husband hunts and we have been able to supplement our meat supply with deer. I was skeptical at first, but I have found that deer meat ( or rather 2/3 deer, 1/3 beef for fat) does not taste any different at all than ground beef. I use deer meat for all our meat dishes except for burgers and meatloaf because those things need a little more fat to hold together. Each package of deer meat is 1 pound, and I always try to save at least 1/2 of the cooked meat for another meal later in the week. And it freezes well, just like ground beef. This way we can get 2 or sometimes even 3 meals from just one package.
\. Since my husband takes his dinner to work with him, and we are making it a rule not to eat out, I know he is going to need a dinner every night during the work week. Most nights I will make dinner for me and the kids, with the intention that he will take the leftovers for his dinner the next night. But sometimes for whatever reason, it works out that there are no leftovers to take. So when I make something like meatloaf for instance, on the off day that I cook his dinner before he goes into work, I will make it in 3 small loaf pans instead of 1 regular size one. This way, he can take one to work and none is wasted, and the other 2 are frozen for some other time. Its especially helpful when our schedule is off and I need something quick to send with him.

3. Use less
Overeating leads to lots of discomfort, both now and later in life, both physically, and financially. We can choose to eat smaller portions or split and save portions. Also, filling up on good-for-you foods vs. not-so-good-for-you foods can make a world of difference in how you feel.

4.Buy local foods
This is something I want to explore this year. There is a lot to be said about the difference in foods grown in our own towns and backyards vs. food shipped in from foreign lands. The term "growing season" seems to be almost outdated when we can pop into the store for nearly any kind of fruit or vegetable year round.
Farmers' Markets are making a comeback for this very reason, and with a little education, anyone can learn to preserve almost everything you could want to eat.

5. Serve just enough
When it is possible, try to cook enough so that dinner and tomorrow's lunch is taken care of in on meal. Know how many servings you will need for both so there is minimal waste.

6. Use what is left
Just today I got all happy inside because I had everything on hand to make tacos. There were only 5 tortillas left in the package so I sent 3 with my husband, and cut up the other 2 for me and the 3 big kids. I used a pound of hamburger(deerburger)  that I had thawed in the fridge the day before yesterday. There was a bit of lettuce in a bag of salad that my sister-in-law had brought for dinner the other night, a tomato from another dinner, a small block of cheddar that I grated up, and a bit of sour cream in the container that I sent with him. Everything but the meat were basically scraps that, by themselves, wouldn't have been worth anything, but put together, they made a whole meal.

The point to all this is, preparation is key to maintaining a budget, no matter what your limit is. Where waste (of food, money, time) is unacceptable, we need to do our part to make sure it doesn't happen.


Homemade Liquid Laundry Soap

There are fewer things I feel better about making for my home than laundry soap. I love that I can produce something that will last a long time and that actually does a really good job of getting our clothes clean. I use it for everything- even cloth diapers. It takes some work, but it really is worth it to be able to keep from literally pouring your money "down the drain."
While store-bought soaps can smell very nice and sometimes you might be able to get a good deal, I like having the ingredients on hand for loads (no pun intended) of laundry soap that is very cheap to make and isnt mostly glycerin, water, and fragrance. If I ever need more, I just make more. Its something the kids like to help with and it gives me a happy feeling inside of providing for the needs of my family.
I use the same recipe the Duggar family uses for liquid laundry soap, only I take it one step further. After the soap has cooled in the bucket overnight, I carefully put it through my blender so I end up with a nice, rich, consistant soap that easily pours into the waiting soap bottles.And it is easier to pour into the little cups when I am ready for it.

Duggar Family Homemade Liquid Laundry Soap:

4 cups water
1 bar of Fels Naptha soap, grated
1 cup washing soda
1/2 cup borax
*I also add about a 1/2 cup of oxyclean to the bucket to help with stains, etc
*glycerin

heat water in saucepan and melt grated bar soap- watch it as it can bubble up and run over if you arent careful.

fill a 5 gallon bucket half way with warm water, add melted soap, soda, borax, and oxyclean(if using) . Add more water until bucket is full. Adding  a few teaspoons of glycerin helps with the consistency.

cover and leave overnight until soap is gel-like on top. At the bottom it will still be watery. Break up the soap and mix with paintstick, etc. Carefully pour into blender cup if necessary, then into empty laundry containers or whatever you want to keep your soap in.

Thursday, January 10, 2013

Welcome


This idea has been mulling around in my head for awhile now. To carve out a little place for all the ordinary things that make a house a home; things that are simple and small, but added up they compose a way of life that seems to have been lost, a melody that has floated away on a breeze and is no longer remembered.
This world is big and chaotic and loud. Our homes should be a sanctuary for our families; to nestle in and comfort and be comforted. A place of refuge and simplicity and rest. My soul yearns for a simpler way of life. To make, cook, heal as our grandmothers and great grandmothers did. I want to create a place of refuge and warmth for my family that can't be bought in a store. It can only be made by hand.
My goal for this year is to learn- slow down and learn to do things myself instead of letting convenience and cost do them for me. Hopefully, I will be able to gain new skills, save some money, and make some long-lasting changes that will create a more purposeful and joyful way of life.