Pages

Monday, October 21, 2013

Are You Ready?

Winter is just around the corner. The days are getting shorter, the air is turning cooler. My kids were so excited to see their breath outside the other morning. The trees in my neighborhood are just spectacular- I don't remember them ever being so bright and utterly breathtaking. It is definitely the time of year I start thinking of hunkering down, finding comfort in flannel sheets, wool socks, and a pot of spicy chili.

If your winters get cold like ours in Missouri do (most of the time, that is. Our weather can be pretty fickle sometimes), do you have a plan for bad weather? Blizzards, ice storms, power outages, and just being snowed in and not being able to get out to the stores? Do you keep enough food in your house to last you more than the average American's 3 day pantry? How about gasoline for your cars, chainsaws, generators, etc? What about warm clothing and extra blankets, alternative cooking methods and lighting? Do you have enough smoke detectors ( with good batteries in them), fire extinguishers, flashlights and matching batteries, a basic first aid kit, enough toilet paper to last at least a couple of days? What about entertainment- books, games, paper and art supplies to keep cabin fever at bay?
The next few posts will deal with all these questions and talk about why its important to prepare for things not to be normal, especially in winter. Maybe you've seen the people who call themselves "preppers" on tv who spend thousands of dollars on all kinds of survival gear and MRE's? My goal is not to be a victim of fear, anxiety, or irrationality. I don't feel the need to live in a bunker in the middle of nowhere with 50 years worth of toilet paper and protein bars. My goal is to make my family as comfortable in any crisis (however small) while staying within our budget, and leaning on the providence of the Lord. As a Christian, I absolutely do not think it is incongruent to both trust in the sovereignty of God to provide and to prepare for an uncertain future by stocking up and learning new skills. I know some people hold a different view, and that's fine. But the more Christians prepare for emergencies, the better off they are to help others when/if the need arises and to be a witness to the suffering as well. 
Noah started building the ark and gathering supplies well before the rains came. Joseph gathered enough food for his people when the times were prosperous that when the droughts came and destroyed everything, none of his people starved. 
The first few posts will deal with the very basics- what to prepare for, how to prepare on a budget, and what the Red Cross, FEMA, and other groups recommend. Stay tuned!

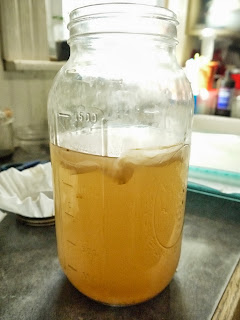
How to Make Apple Cider Vinegar...and How to Use It


Recently I bought a big box of apples at the amish store to dehydrate into Cinnamon-Sugar Apple Chips. I also made a few pints of applesauce. I could have composted the cores and peels, or used them to make jelly or maybe gotten a small amount of juice out of them, but instead I decided to try to make my own apple cider vinegar. 
Basically, you just take all the scraps- peels, stems, cores, all of it (except any diseased spots- which you won't have to worry about if you get yours from the grocery store) and submerge them in water in a container you can easily cover with a towel or cheesecloth or a coffee filter. Ideally the scraps will keep under the water completely, but usually they float to the top. Don't worry too much about that.
Sprinkle about a tablespoon of sugar over the top for every quart or so of water and cover lightly- the mixture still needs to get oxygen so the yeast will stay alive and do its job. Leave it in a dark warmish place for a week. I keep mine on top of the fridge since that seems to be the warmest place in my kitchen.
After a week, strain out and compost the scraps and keep the water.Pour it back in the jar and cover it lightly again and put it again in a dark place- wrap a towel around it or put it in a paper sack. It will continue to grow the "mother" for a few weeks. It will start to smell vinegary and that is good. 


After a couple of days you will probably start seeing a filmy thing floating on the top- that's the mother. The mother is the important part (aren't all mothers?) It is full of living enzymes that are super good for you.When its done, you can use the mother to start a new batch and it won't take as long, The mother will get thicker as the weeks pass.
Keep checking on it if you're a nerd like me and get excited about weird things like this, or don't and just leave it be. When about 4-6 weeks have gone by, pour off the mother into a clean jar, along with some of the vinegar and all the sediment on the bottom. Keep it for when you start another batch with fresh apple juice or scraps. Use the new vinegar the same as you would store-bought. 


How to Use Apple Cider Vinegar:

as a facial astringent
as a conditioning rinse after washing your hair with baking soda- it promotes shine and hair growth and is anti-dandruff
as a mouthwash- it is antiseptic and also helps keep bad breath away
as a detoxifying daily drink ( mix a couple of tablespoons with water or regular apple juice)- the probiotics help with all kinds of tummy troubles
as a swelling reducing rub
as a sinus decongestant
as an insulin regulator- it is anti-glycemic
as a sunburn remedy
as an arthritis relief- the potassium helps block calcium build up in joints


Monday, October 7, 2013

Bulk Pancake Mix

Here is something really simple and quick to make that will provide you with a lot of breakfasts in a jiffy- your own homemade bulk pancake mix. And its so good too!

{From areal-lifehousewife.com}
Homemade Pancake Mix in Bulk
Author: 
 
Ingredients
  • 9 cups flour
  • 1 cup plus 2 tablespoons sugar
  • ½ cup plus 2½ tablespoons baking powder
  • 6 teaspoons salt
  • 1½ cups milk
  • 3 tablespoons butter, melted
  • 2 eggs
  • ½ teaspoon vanilla extract
Instructions
  1. Whisk flour, sugar, baking powder, and salt together in a large bowl and store in an airtight container.
  2. For a batch of 10-12 pancakes, combine milk, butter, eggs, and vanilla extract in a large bowl. Add a heaping 1¾ cup of pancake mix and stir just until combined.
  3. Pour onto a greased hot griddle, using about ¼ cup for each pancake. Let cook on each side until lightly browned.

Make Your Own Brown Sugar!

             Have you ever seen the ingredient list on the package of brown sugar? Its just sugar and molasses- how did I not know that? Unfortunately I needed brown sugar in two recipes this week and had no brown sugar. Fortunately I did have a bottle of molasses in the pantry for some strange reason.  

                    Add molasses a little at a time to the sugar until you get the right color and consistency. 
 
Store in an airtight container.

Tuesday, October 1, 2013

Shine On, Harvest Moon

Fall is my favorite time of year- my favorite season that is. I love the changing colors of the trees and scents of fires burning and dug up earth. I love the feeling of breezes just cool enough to make a light sweater appreciated and the crunch of brittle leaves underfoot. It's also hunting season and I'm hoping HH gets a deer or two for our new(to us) freezer. In a few weeks we are also gettting 1/4 cow and we've never done that. i'm pretty excited at the thought of all that food in the freezers-good, clean, non-gmo,grass-fed ,barely processed food.

Its the time of year our ancestors called Harvest- something we rarely do anymore as "seasons" have all but been erased when it comes to the availability of food. Harvest time used to dictate the start of the school year, and it was the reason for initiating Daylight Savings. It was the herald of the second half of the year- the time when all the worrying over weather, all the sweat and sore muscles and labor could be justified with celebrations of thanksgivings for the bounty their God, their land, and their own hands had wrought.
Sadly, we don't really participate in harvest time anymore. The grocery stores supply their own bounties-perfect, uniform, shining examples of the best of what miracles of time and space have to give us. No mis-shaped apples, no gnarly carrots, no specks of dirt on the potatoes that betray their humble beginnings.

I'm so thankful we had a garden this year. It was a lot of work but it was good, hard work and it felt good to be out there every day with my feet and hands in the soil, getting to know our plants. At first, when the first fruits appeared I wondered if Eve had felt the same way- hoping and waiting for her own plants to grow after the heartbreak of leaving a place where food sprouted from the words of God. Did she ever, like me, jump up and down laughing like a maniac shouting "Its working!Its working!" not caring if her neighbors thought she was losing it? 
Not only did our garden provide us with food, it gave us a months-long study in life-cycles, insect identification and pest management, cross-pollination, and dependency on weather and the will of God to provide. We learned so much about how to save seeds, how to compost, why tomatoes crack, when squash vines need calcium, and how beautiful okra flowers are. Most importantly, we learned where our food comes from, and what fresh food really tastes like. We learned how many colors the inside of one tomato can hold, and when peas are the sweetest. I learned I like green beans, and our kids learned not to be afraid of a little dirt on their carrot.
Now we are tearing down what little is left standing, turning the soil and putting the beds to bed, so to speak. I'm not going to lie, its a little sad laying bare in a few hours what took months to mature. But we've been saving seeds and there is that which our ancestors must have had too-hope that next year will be just as good or even better.

Homemade Ketchup

Confession: I bought 200 pounds of tomatoes the other day.
But it's ok because I had a plan. I mean what crazy person goes and buys 8 boxes of tomatoes without a plan? Not me. Nope. Certainly not.
Ok, I had a plan for about 1/3 of them.
I also bought 10 dozen eggs and 4 pie pumpkins.


We ate alot of sandwiches that week.

And didn't do a whole lot else.

Some people thought we were a little cuckoo but now I have a pantry full of yummy homemade goodies that will last a long (long) time.

Tomato sauce, diced tomatoes, whole tomatoes, salsa, hot sauce, barbeque sauce, and ketchup.

Why make ketchup when its so cheap at the store, you ask?
Doesn't it take a long time?

Yes, yes it does. But- No corn syrup! No high fructose corn syrup! No "natural and artificial flavorings"! And a lot less salt than commercial ketchup.

Here is the recipe I used, from the Ball Complete Book of Home Preserving. I tried it out on my 5 year old- the one who can eat her weight in the stuff so she's kind of the resident expert, and although she was hesitant to try something mommy made herself, she was surprised and happy that it tasted just like the stuff in the fridge.

Makes about 7 pint jars...

3 tbs celery seeds
4 tsp whole cloves
2 cinnamon sticks, broken into pieces
1 1/2 tsp allspice
3c cider vinegar
24 lbs tomatoes, cored and quartered
3c chopped onions
1 tsp cayenne pepper
11/2c sugar
1/4c pickling or canning salt

1. Tie spices in a spice bag
2. In a stainless steel pot, combine vinegar and spice bag. Bring to a boil over high heat. Remove from heat and let stand about 25 min. Discard spice bag.
3. Meanwhile, in another stainless steel pot, combine tomatoes, onions, and cayenne. Bring to a boil over high heat, stirring frequently. Reduce heat and boil gently 20 minutes. Add infused vinegar and boil gently until vegetables are soft and mixture begins to thicken.
4.Working in batches, transfer mixture to a food mill and discard solids.
5. Return liguid to sauce pan. Add sugar and salt. Bring to a boil over medium heat, stirring occasionally. Reduce heat and boil gently, stirring frequently until volume is reduced by half and mixture has the consistency of commercial ketchup.
6.Meanwhile, prepare canner, jars, and lids.
7. Ladle hot ketchup into hot jars, leaving 1/2 in headspace. Remove air bubbles and wipe rims. Center lid on jar, screw bands on fingertip-tight.
8.Place jars in canner making sure they are completely covered with water by about 2 inches. Water bath for 15 minutes. Remove lid, wait 5 minutes and remove jars. Let them sit at least 12 hours before moving them. You can remove the bands before storing. Make sure all lids have sealed by pressing down the middle of the lid- if it doesn't flex up and down its sealed! I usually lift the jar by the lid also just as a secondary measure to make sure its sealed. Store in a cool darkish place.

And in case you're wondering about the eggs-
We go through alot of eggs for eating and baking, so some we used up, but most of them I broke individually into little plastic cups, scrambled a bit and froze to use later because our egg lady is out and we like our farm fresh eggs!

Saturday, September 28, 2013

Saving Seeds {Heirloom Tomato}

These days my kitchen is looking more like a science lab and less like a place to cook and eat. My windowsill and countertop is filled with seed saving experiments and random growing things. Here is a really easy and excellent fruitfly trap. Just a piece of computer paper rolled up in a vase with a piece of fruit and a little water. The fruit flies love it and if the paper at the top touches the sides of the vase they cant get out.
Also, there are some rocks from the kids and a lemon tree that we've been growing all summer now.
I've been saving the seeds of 3 tomato varieties this year- Amish Paste, Big Rainbow, and Beefsteak. All our seeds this year came from Baker Creek (rareseeds.com) and are heirloom, open pollinated, and non-gmo so they can be saved and will grow true to type next year.
Here's how to save tomato seeds- Scoop out the seeds and fleshy parts of the tomato insides into a mason jar- save the outer meaty parts for making sauce or to use in salads.When they are fresh, the seeds are covered in a slimy coating that makes it hard to pick them up. Fermentation will remove the seed coats. Cover with cheesecloth or (my preferred method) a coffee filter. Screw the metal band on. This way the fruit flies can't get into the jar. Put the jar in the window or on the counter or wherever. In a couple of days it will start looking kinda gross and there might be some white fuzzy stuff floating around in there. Add some water to the jar and swish it around and when it settles you'll notice that the seeds drop to the bottom. Carefully pour out the water and fleshy parts, keeping the seeds in the jar. You might have to refill with water and repeat a couple times to get everything out. strain the water out and pour the seeds on a piece of wax paper on a plate and let dry for a day or two. The seeds will be soft and fuzzy and you can put them in an envelope or clean dry jar, label it, and save them for next year! 

Homemade Peanut Butter


Making your own peanut butter is so easy and you know exactly what is in it. And it can be cheaper than buying the "all-natural" kind.
I get organic roasted peanuts at Nature's Pantry for about $2 a pound. I get a few pounds at a time. If you don't think you'll use all you get in a timely manner they freeze well. I fill my blender cup a little less than halfway. You don't have to add any oil because the peanuts will release their own oil as they mash up. It will take awhile. Your husband will come in the kitchen, peer in the blender and suggest its not going to work. But don't worry- it will! 
You can make it as crunchy or smooth as you like - the longer it blends, the smoother it gets. Then just scoop it out into a mason jar or into the empty peanut butter jar

Saturday, August 24, 2013

Homemade Vanilla Extract

Did you know it is so easy to make your own vanilla? I have always bought the cheapest imitation stuff. My sister imports hers from Mexico. This is a better (than the first) and cheaper(than the second) option to either. It takes awhile, so start now!


You will need some vanilla beans and vodka and a dark jar with a lid or a clear jar with a lid and a place to hide it.

Take the beans and slit them lengthwise top to bottom on one side. Pour the vodka in the jar, add the beans, give it a shake and screw the lid on. Let it infuse in the dark at least 3 months, but 6-12 is better. (thats why you should start now) Then repeat with a new batch in a couple of weeks or months. When you begin using the vanilla, just add more vodka to the jar and shake it up. Thats it!

Hello Again

 A hearty sorry to my 2 followers out there for not posting this summer.
Our first year (so far) at gardening has gone really well. It's definitely been an ongoing lesson in patience, determination, and gentleness. Several times I've pulled up a viable plant along with the weeds. Jeremiah mowed over 1/6 of our sunflower patch because I hadn't marked the straggler flower well enough.
Not enough water, too much water. Blossom End Rot, splitting, aphids, powdery mildew, and weird insects I've never seen before have confused and frustrated me to no end some days.
But how much we have learned!
 How beautiful the Okra flowers are! And Serrano flowers look like tiny Spanish dancers.
Watching a bee do its dance with the big orange pumpkin flowers or the curly purple ones on the green beans is so exciting.
Our Jack-Be-Littles are spreading out and exploring the yard. The Amish Pies may have died as their vine stalk seems to have been chewed or stomped on by something. I poured in compost and bone meal and today it has a flower, so only time will tell. I planted a couple more just in case. Next year, I want to have a whole pumpkin patch.

Our green beans have been the funnest yet. Our pole beans took a long time to come in but they are huge. Its so fun hunting for the beans. I've been able to can 17 pints and 2 quarts so far, and given away lots more.
We've pulled probably 8-10 zucchini, much less than I thought we would have so far. I've been able to make 14 pints of pickles. Most of our tomatoes are still green, but getting bigger. Al Kuffa is the kind we've been getting consistently but they are small and most of them are splitting. I've been saving them in the freezer though to make into sauces later.

We hope to add some more of these soon.


Wednesday, June 5, 2013

More from our Garden

Here are some up close photos of our garden. It's been so rainy here lately the weeds are having a hayday.  I love going out first thing in the morning to see what is new and what has changed. It seems like they grow so much overnight. Its really magical.
We still have pie pumpkins, cucumbers, and zucchini to plant. And we are waiting on 1000 red wiggler worms to arrive and take up residence in our compost pile.
When we transplanted our tomatoes, they really looked like they were on their way out. We didn't think they would make it. We scooped out a hole for the root ball and threw in a handful of peat moss and a handful of crushed eggshells ( farm fresh, not store bought) and they look great now. The egg shells give them a boost of calcium from the roots up and they really needed it.We did the same in our strawberry plants too.
All in all, we have 6 raised beds, 20 pots, an onion bed, and a garlic bed.
we planted 5 okras but only 3 remain

our carrot hill

sugar snap peas

we just transplanted 11 strawberry plants

bush green beans

tango, red romaine, and mesclun mix lettuces


Saturday, April 13, 2013

Some Thoughts of Being Normal

We are reading Joel Salatin's book, "Folks, This Ain't Normal" and I have to say, it's darn near life changing. The idea that most of us have no idea, and don't care,  where our food comes from is startling, and up until a couple of weeks ago, it didn't bother me at all- I never even thought about it. We are so removed from the agrarian society we used to be. We can run to the store ( and have a myriad of stores to choose from) for just any old thing we want. Shipped in from who-knows-where twice a week or more. There really is no such thing as "seasonal produce" anymore. Whatever we want, whenever we want. As long as we have the money to buy it, its ours. Instant gratification.
One day we hope to live out in the country, but right now we live in town and on the other side of our fence is a small chain store. Every day there are big trucks backing up to deliver dairy products, shelf-stable processed foods, toilietries, etc. Sometimes twice a day. Where is it all coming from? Who is making it all? And when was it made?
The New York Times published an article called The Extraordinary Science of Junkfood that I read recently. Its long but worth the read if you are interested in how food manufacturers produce and market their products. Its also kind of sickening because ultimately, their "food" is really just manufactured tastes and scents, pieces of this and that and chemicals to make us want more, and a pretty package. Which is where I'm torn. Because some of it does taste really good. But I can tell you, I will never feed my kids lunchables again.
Partly because of Joel's ideas and partly because of a class we took at church about re-training our bodies to eat differently, the way God intended us to eat (fresh vegetables and fruit, meats, nuts, etc. Not the processed, manufactured foods we are used to eating) we've been really reevaluating how we come by the food we eat. We've been growing our seedlings and putting in our raised beds. We've been getting fresh farm eggs locally, and next week we are going to get some local raw milk. We eat lots of salad now but are trying to stick with organic non-irradiated fruits and veggies. The HH's brother and his wife are starting a new life as farmers and we hope to be able to support them by buying chickens and whatever other kinds of meat they raise. They are big fans of Joel Salatin too.
 I never thought I would be one to choose the organic stuff or search out butter from cows that weren't given the growth hormones but it feels good knowing that for us, this is the better choice. I can only say what's best for my family, and I like having this sort of a relationship with or knowledge about what I'm feeding them.
You might notice I haven't posted any bread-related recipes lately (except the birthday cake) and that's because we no longer eat bread. Which is crazy I know. I used to eat bread all the live long day. But in our class we learned about how our bodies react to grains and carbs and it was all very sciency so I won't bore you. But there won't be too many bread type recipes here anymore sad to say. But I look forward to posting more to do with the fresh foods. It's kind of a challenge sometimes to make things myself instead of buying them but its also fun and I know the more I can lessen our dependence on the supermarket food supply, the better off we will be.


Homemade Yellow Cake and Chocolate Frosting

Mmmmm. This is my favorite kind of cake. This week we celebrated my mom's birthday and I offered to make her whatever kind of cake she wanted, and she chose this kind. I love the kind in the box, but I didn't have any and I'm so glad I found this recipe because I will never make buy another one. The frosting is a little sweeter than the tub kind, it reminds me of the kind on doughnuts. Yum! I accidentally ate about 1/4th of a cup before I knew what was happening. The cake is a bit more dense but richer tasting than the box mix.


The Cake: ( Mix the following in a quart size bag and freeze up to 2 months, or leave out the butter and vanilla and store in your pantry.)

Note: the recipe calls for cake flour, which I never have on hand so I substituted 2 3/4 cups plus 1 tablespoon all-purpose flour and 3 tablespoons cornstarch for the three cups of flour called for in the recipe. It worked beautifully.
Ingredients
  • 2 cups granulated sugar
  • 1 1/2 cups all-purpose flour
  • 1 1/2 cups cake flour
  • 1/2 cup nonfat dry milk powder
  • 1 tablespoon baking powder
  • 1 teaspoon salt
  • 16 tablespoons butter (2 sticks), cut into 1/2-inch pieces and chilled
  • 1 tablespoon vanilla extract
Directions
  1. Process sugar, flours (or flour and cornstarch if making the substitution for the cake flour), milk powder, baking powder, and salt in a food processor for 15 seconds to combine. Add butter and vanilla and pulse until the mixture resembles coarse meal (you want this much finer than, say, a pie crust). Freeze the dry mixture in a zipper-lock bag for up to 2 months or use immediately.
  2. To make the cake, adjust an oven rack to the middle position and preheat the oven to 350 degrees. Grease and flour your pan of choice (see the note above the recipe).
  3. With an electric mixer, beat the prepared cake mix, 1 1/4 cups warm water and 2 large room-temperature eggs until the mixture is smooth, about 2 minutes. Scrape the batter into the prepared cake pan(s) and bake until a toothpick inserted in the center comes out clean, about 25-27 minutes for two 9-inch layer cakes. See the note above the recipe for alternate cooking times with other baking pans. Cool the cake(s) in pan(s) for 10 minutes, then turn out onto a wire rack. Cool completely
The Frosting: Chocolate Buttercream Frosting from Food.com

6 tablespoons butter, softened
  • 2 2/3 cups confectioners' sugar
  • 1/2 cup cocoa
  • 1/3 cup milk
  • 1 1/2 teaspoons vanilla
    1. Place butter in a bowl and beat until creamy.
    2. Add sugar and cocoa, mixing well.
    3. Stir in milk in portions, stirring each time.
    4. Add vanilla.
    5. Spread on cooled cake or other items needing frosting
    I also added a bit of flour to help it stand up a little more- it was very soft and creamy. I probably could have let it cool in the fridge and gotten the same results.

    Wednesday, March 27, 2013

    Homemade Poptarts


    For real.
    My kids like pop tarts but I'm not a fan. I think they look and taste like cardboard, but hey,they have sprinkles, so they love them. But they can get pricey and there aren't many in the box and split between 3 kids is about one box per breakfast.
    There are a few different recipes for homemade poptarts, without the ingredients I can't pronounce ( and with sprinkles!) floating around Pinterest, but I found this one on Smitten Kitchen and we tried it tonight. I ended up cooking ours for longer than the recipe says to- about 20-25 minutes. We did half cinnamon-sugar and half (homemade) strawberry jam and they we so good! We also made them mini just for fun. The kids ate a few for a snack and we are saving the rest for breakfast. Next time I will try drizzling them with icing.Yum!

    Go here for the recipe ( it's long, but these are so easy and quick to make.) I bet you could even freeze some and toast them later.

    Tuesday, March 26, 2013

    Homemade Spaghetti Sauce for Canning

    I made this sauce this week and really surprised myself- usually my spaghetti sauce turns out either too sweet or too spicy. But this one is just right. And it looks so nice in jars all lined up on the shelf...


    Ball's Blue Book Spaghetti Sauce (with some minor adjustments)

    -makes 4 pints plus a little left over (I doubled this and made 4 quarts)

    2c chopped onions
    2c chopped green and yellow peppers (2c total)
    1c chopped celery
    4 cloves garlic, minced
    2 tbsp oil
    18oz tomato paste
    24oz tomato sauce
    1-28oz can whole tomatoes, chopped
    2 bay leaves
    2 tsp italian seasoning
    1 tsp basil
    1 tsp salt
    1\4 tsp pepper

    Saute onions, peppers, celery, and garlic in oil until onions are tender. Add remaining ingredients, simmer 1 hour.
    Remove bay leaves
    To can, follow instructions for WaterBath Canning. Add 1 tbsp lemon juice to each pint jar. Remove air bubbles, wipe rims and process 45 minutes.

    *I love to can and do it all the time,but I'm not a "professional". Please refer to the Ball's Blue Book of Canning for instructions and to answer any questions. Canning is a lot of fun, but its also pretty serious stuff so it's a good idea to know what you are doing before you do it!


    Thursday, March 21, 2013

    Good grief. Is anyone else ready for Spring and warm weather and no more sickness? I sure am. I have more posts coming up soon and I am really excited to get back to blogging.
    Our seedlings are growing and I can't wait to plant our raised beds and grow our own produce. So far we have a couple different kinds each of lettuce and spinach, a few varieties of tomatoes and some peppers. We are also going to do Amish Pie Pumpkins, potatoes, carrots, green beans, onions and garlic.
    Why raised beds?  With raised beds you don't have to till the ground, there are less weeds and you have more control over where everything goes. You can plant things all over your yard instead of one big patch. Plus, we got some railroad ties from HH's brother and we don't have a tiller.
    I'm also thinking of using the front flower bed as an herb garden.
    And I want to plant lots of these:
    Peppermint Stick Zinnias

    We get our seeds from Baker Creek- all heirloom, non-GMO.

    We have virtually no idea what we are doing so this will be an interesting experiment. Our plan is to grow as much as we can, preserve what we don't eat fresh, and use some to barter for honey across the road, fresh eggs from friends, and who knows what else. The sky's the limit!
    Have you ever bartered? Its not such a big thing here but a lot of cultures do it. I would like to do it- I think its a really interesting concept. Plus it would help save some money on groceries.
    Speaking of which, I canned up some really great spaghetti sauce yesterday and I will post the recipe this weekend. See you then!


    Tuesday, February 19, 2013

    A New Month- Almost Over

    Well, call me a statistic. The flu totally kicked our tails this year. Three weeks of jello, Netflix, and tylenol have really taken its toll on our daily routine. But now we are better and back to doing school, laundry and wearing clothes that aren't pajamas.
    I can't believe that February is almost over already. Time flies when you are having fun sleeping through a fever. Well, even though its a late start for a short month, I've decided that this month's theme is ...

    *Preparedness*

    Doesn't that sound fun?

    For the first post, we will talk about making a Family Emergency Binder. Basically its a binder for all your important information that you would take with you if you had to leave your home in an emergency. I'm sure there are other things you could call it, but thats what I call mine.

    1. What kind of emergency are we talking about here? Well, we live in Missouri and we tend to get a lot of tornado watches and warnings in the springtime. And we don't have a basement, so in case of a tornado threat, we would have to leave the house and go to my in-laws in a hurry. Depending on your location other emergencies could include earthquakes, power outages where you would have to go stay someplace else, fires, floods, train derailment and subsequent evacuation, or any number of things.

    2. What is in this Emergency Binder?
    In ours, I have a page for every family member with a current individual photo ( for the kids I am also getting an older photo of each one with both parents in it). Each page includes ss# birthdate, hair and eye color, current height and weight, allergies, medications, parent contact info, alternative contact info,identifying moles/birthmarks,pediatrician info,school and work info,
     and I will be adding fingerprints also.

    I also have pages for each of the following:
    copies of drivers licenses, birth certificates, copies of passports, social security cards
    info on doctors, dentists, pediatricians, etc
    copies of most current utility bills, mortgage, etc
    copy of statements from all bank accounts
    current family photos
    kids immunization records
    copies of health insurance cards
    a cd with our wedding photos
    a cd of our family photos
    a contact list of family and friends, and a special list of who to call to watch our kids if needed
    a copy of all our adoption paperwork
    car titles
    photo documentation of important items around the house
    instructions for turning off gas, etc
    list of things to take with us if we have time
    list of things to do to the house if we have time

    some things you could also put in if they apply to you:
    current credit card statements
    pet info- vaccinations, photo, ver info, etc
    lists of medications
    rental agreements
    copy of last paystub(if you get paper ones)


    Basically, anything I would not want to have to rack my brain for in the middle of chaos and confusion is what I have in our binder. This way, I can grab it and go and have everything I need to know at my fingertips. Also, it would be helpful in proving ownership or residency in case of evacuation.


    To order a birth certificate in Missouri go here
     Here is an excellent list for emergency binders with printables for child id kits

    Saturday, February 2, 2013

    Homemade Baby Food : Stage 1

    Now that The Babe has a tooth and is starting to eat "real" baby food, I am almost through my stash he got for Christmas. I have been saving those little plastic containers and lids and they are so convenient for holding homemade baby food.

    Today I peeled,chopped, and boiled 4 lbs. of carrots (and about a cup of frozen corn we picked this summer), mashed them up in my blender and froze them into the containers as well as a couple of ice cube trays which give me the perfect size single servings for him right now. Label and date and call it a day. So easy. $1.76 for 32 servings and I know exactly what is in each one.


    Friday, February 1, 2013

    Homemade Frozen Pizza


    I never would have thought of making frozen pizza at home. I usually just make it to eat right then. Tonight I doubled the Pizza Dough recipe and made 2 medium-ish pizzas for the freezer. Here's how I did it:


    1. After the dough has risen, punch down and dump out on a floured surface. Knead to bring it together, until it is soft and elastic and easiily forms a ball. Transfer to a circular pizza pan (or whatever pan you intend to bake it on) and press with your fingers or use a rolling pin to stretch the dough out to fully cover your pan.
    2. Sprinkle your dough with garlic salt and italian seasonings if you want to
    3. Bake at 400 for about 8-12 minutes until firm and dry but not too dark brown.
    4. Let it cool, then add sauce, cheese, and toppings. Freeze on the baking sheet until completely frozen, then take off the pan and wrap in plastic wrap

    Cinnamon Swirl Bread


    Have you ever made french toast with cinnamon swirl bread? I did once and it was soooooo good. The other night I made my cinnamon roll dough and thought I'd test it out and see if I could make a good swirl bread and it worked! After I rolled the dough up with the cinnamon and butter inside, I cut it into thirds and fit it snugly in my loaf pans, let them rise until they were about a half inch or so higher than the top of the pan, and baked them until a toothpick came out clean. So easy. I ended up making 3-4 loaves and stuck them in the freezer until I have some time to make a batch of french toast.


    Tuesday, January 29, 2013

    Flour Tortillas


    Today I went to make tacos for lunch and all we had were the crunchy taco shells-no tortillas. I think I'm the only one here who likes the shells, so I pulled out this recipe for tortillas I've been meaning to make. They take a bit of work- it's really a chore to roll them out because they are so elastic and want to keep snapping back into a smaller ball but in the end it was really worth it. They are so much better than store bought tortillas.  The Handsome Husband even said "Hey these look like real tortillas!"
    Real Tortillas?
    "Yeah like the ones at the store..."
    Hmmm.


    Flour Tortillas

    2 cups All purpose flour
    1 tsp Salt
    1 1/2 tea Baking powder
    2 tsp Vegetable oil
    3/4 cWarm milk

    Mix dry and wet separately, then together. Mix together well, then knead about 2-3 minutes. Form dough into a ball,  cover with a towel and let rest 20 minutes. Cut ball into 8 pieces (like a pizza) and roll each piece into a ball. Roll each ball out into a big circle. Spray a cast iron skillet with cooking spray and fry each tortilla about 45 seconds on each side or until dry and brown spots appear.

    Monday, January 28, 2013

    What Next?

    Not such a  long time ago, women were championed as managers of their homes. To be called a housewife wasn't an insult, it was something to take pride in. It meant you worked hard to keep your family clean, fed, safe, nurtured, warm, clothed, and happy. Sure it was a lot of work without such modern conveniences and technology as we have today, but I would bet those women felt good about doing it, because they loved their families.
    I think that for all the "progress" of the Womens' Rights Movement, we as the heirs of the generations of women who balked at wearing an apron over a dress, or "sacrificing" a career to stay home have really missed out on a whole way of life you just can't find in 9-5 job or in the aisles of any supermarket.
    Did you know that when housewives were first introduced to Betty Crocker's line of boxed cake mixes (that were the "just add water" variety) they wouldn't buy them because they felt like they were cheating their families out of a home-baked dessert? So the company decided to produce mixes that needed an egg, and then housewives didn't feel so guilty about the convenience of using them.
    Now everything is about convenience. Not that its always a bad thing, but what is it costing us in money, nutrition, and knowledge? And what is filling up that time we are supposedly saving? There are a lot of things I don't know how to do because they weren't ever necessary to learn. I always counted on someone else, in a factory or warehouse, or someplace far away to do them for me, and it was so easy just to pay for that so I didn't have to do it. But I've kind of grown tired of not knowing how to pronounce what is in the food we eat or not knowing where our clothes and toys come from and who made them.
    That's really my hope ( one anyway) for this year- just to learn how to do the things my grandmothers did, and their mothers before them. I have learned so far that I love kneading dough by hand, and I like the feeling I get when I see my kids in clothes that I have made for them. I like sitting down to eat with my family and knowing I made something that didn't come from the freezer section, although it still happens occasionally). I love the history of my cast iron,  canning is fun and not so scary after all, and I am excited to learn how to garden and actually grow things we need.
    There are so many things new things I want to learn this year- how to knit, make soap, sew by hand, make cheese, make clothes for boys, bake a white bread we can use all the time, make a quilt, save seeds.. I'm really excited about it all. January's almost over, I will keep adding things I learn to make at home instead of store-bought, but what should February's main topic be? Any suggestions?

    Dog Treats

    For awhile in high school, I worked at a little boutique-type shop that made and sold dog biscuits. All morning long, 5 or 6 of us would mix dough with giant industrial size mixers, roll it out and cut biscuits by hand. It sounds tedious but it was actually really fun. We made lots of different kinds, of all sizes and shapes.
    All-natural dog treats can cost quite a bit, but here are some you can make at home that hardly cost anything at all. And they are completely safe for little humans, just in case they think they need a treat too...


    Dog Treats from Fake-It-Frugal
    Ingredients:2 Tablespoons Vegetable Oil
    1/2 Cup Peanut Butter
    1 Cup Water
    3 Cups Flour

    Mix everything together until dough forms a ball. If you are using a stand mixer, use the dough hook and it will mix up really fast. Roll out dough onto surface ( doesn't need to be floured, they won't stick) and cut into strips with a knife, then across in the size you want, or use mini cookie cutters ( or regular size if you really, really love your dog) Bake in oven at 350 for 20 minutes. Divide into a week's worth of treats and store the excess in the freezer.

    Friday, January 25, 2013

    Cinnamon Rolls #1 w/ Cream Cheese Icing


    These cinnamon rolls come from The Husband's Great Aunt Nadine. She is one of my favorite aunts, and these are quite possibly my favorite cinnamon rolls. They rely on a yellow cake mix and about a total of an hour's rise. They are best if you make them the night before and serve them in the morning, That way the icing can fully infiltrate the rolls. I put these in 2 8x8 square pans, bake one, and freeze one after shaping the rolls. The icing freezes well too.
     I made a pan of these and left them out last night.The Handsome Husband ate 3 by himself when he got home this morning. And he never does that. They are just that good. I think they taste a little like those cinnamon rolls you buy in the rectangle package with the white icing that peels off. I don't know what they are called, but I'm sure these are much better for you than those ones.


    Great Aunt Nadine's Cinnamon Rolls

    Proof 2 packages (4 1/2 tsp) yeast in 2 1/2 cups warm water.

    Add one box yellow cake mix and stir well.

    Add in 5 cups of flour, mix together thoroughly, and let rise until double in size.

    Punch down dough and turn out onto a floured surface. Knead a little to bring it all together. Roll out until about 1/2 inch or so thick.

    Spread with melted butter, then cinnamon and sugar. Roll up tightly, cut, and place in pan. Let rise again for about 20 minutes and bake at 350. Pour icing over the rolls, (let icing glaze over and dry) cover, and let sit overnight.


    Cream Cheese Icing
    1/2 cup softened butter
    1/4 cup softened cream cheese
    1/2 tsp vanilla
    1/2 cups powdered sugar
    1/8 tsp salt

    Mix all together until fluffy.

    Thursday, January 24, 2013

    Enchilada Sauce

    One of HH's favorite meals is chicken enchiladas. I always seem to forget to get enchilada sauce at the store though. It never occurred to me that it would be possible to make it at home. Here is a really quick and easy way to make it yourself. It looks, smells, and tastes just like the store bought version, and is much cheaper. This made enough for me to freeze two portions and use a third for dinner.

    Red Enchilada Sauce
    {Budget Bytes}

    Total Recipe cost: $0.80
    Recipe Yield: 2 cups
    Prep time: 0 min. Cook time: 5-10 min. Total: 5-10 min.


    INGREDIENTSCOST
    2 Tbspvegetable oil$0.10
    2 Tbspall-purpose flour$0.02
    2 Tbspchili powder$0.30
    2 cupswater$0.00
    3 oz.tomato paste$0.27
    1/2 tspcumin$0.03
    1/2 tspgarlic powder$0.03
    1/4 tspcayenne pepper$0.02
    3/4 tspsalt$0.03
    TOTAL$0.80


    STEP 1: Add the vegetable oil, flour, and chili powder to a medium pot. Turn the heat on to medium and whisk the ingredients together. Continue to whisk as the mixture begins to bubble. Whisk and cook the mixture for one minute once it begins bubbling.

    STEP 2: After one minute, whisk in the water, tomato paste, cumin, garlic powder, and cayenne pepper until smooth. Allow the sauce to come up to a simmer. Once it reaches a simmer it will begin to thicken slightly.

    STEP 3: Starting with a 1/2 teaspoon, add salt to taste. I used about 3/4 teaspoon total. The sauce is now ready to use!

    Wednesday, January 23, 2013

    French Baguettes {and Sausage Bread}


    This blog originated with my desire to learn how to make bread myself. I love bread of all kinds. So when I (used to) go grocery shopping, I would of course stop by the bakery and pick up a loaf or two of french bread.Its so versatile. But they always seemed to be very tough or stale and not very appetizing at all. And the price continued to rise for what appeared to be a smaller portion than before.
    So this blog was started as a way to keep all these recipes I wanted to teach myself safe and also share them with anyone else who might like to learn some new tricks. In uncertain times, its always good to know how to do things yourself. Not that we are destitute mind you, but a penny saved is a penny earned, right?

    Today I had no idea what to make for lunch. No. Clue. That hasn't happened since I started my Homemade Resolution at the beginning of this month. I finally decided on Sausage Bread because we had some leftover cooked sausage and a tiny bit of cheddar and pretty much nothing else in the fridge. Sausage Bread is The Handsome Husbands' family's favorite treat. They only eat it at Christmas and it's very, very good. But, they make it with Pillsbury French Loaf dough you get in the can. Which was certainly not in my fridge this morning.


    So I used this recipe for crusty french baguettes I found the other day. This is actually the second time I've tried it and this time I nailed it. Crusty on the outside, soft  and not doughy on the inside. I made 2 smallish baguettes and one large loaf of Sausage Bread with this recipe, which didn't last long at all.

    Quick & Crusty French Baguettes
    • 2 cups very warm water
    • 1 packet yeast
    • 2 tablespoons sugar
    • 1 1/2 teaspoon salt
    • 3-4 cups flour
    Preheat the oven to 425 degrees.  In a large bowl, whisk together the warm water, yeast, and sugar.  Set the bowl on top of your preheating oven for ten minutes.  Stir in the salt and add the flour a half-cup at a time, until the dough becomes soft but not sticky.  Knead the dough until elastic.
    Cut the dough into four even pieces.  Roll each of them into four long, thin ropes.  Twist together two of the ropes to form one loaf.  Twist the other two ropes together to form a second loaf.  Transfer both onto a large baking sheet lined with parchment paper.
    You can now bake the loaf right away (if you’re in a hurry) or allow it to rise for an additional 15-30 minutes on top of your warm oven.

    Bake for about 25-30 minutes or until bread is golden brown on top and sounds hollow when you tap it.

    I also did an egg wash to help it brown up a little and to make it a little more crunchy on top.

    And here is the recipe for Sausage Bread:

    Divide the dough in two parts. You will only need one for this, it makes a large loaf. Cut the dough in half.for the top and bottom.


     Spread the bottom part out on a cookie sheet and press with fingers until about 3 or so inches wide, and as long as your sheet. Spread out cooked sausage ( regular pork sausage, bacon and pork, or half and half) over dough and press lightly into dough to keep it from falling out. Sprinkle some cheddar cheese on top, then some more sausage. Lay the top dough over and pinch sides to seal.


    Bake as directed above.

    Waffle Mix


    Last night,  Lovely wanted waffles for dinner. I already had something planned, but I told her we could have them for breakfast. So before I went to bed, I searched pinterest for a good waffle mix from scratch and this is what I found. These are by far THE BEST waffles I have ever had. They taste like french toast. My kids said they taste like marshmallows, and that they are "gooder than the other kind", (the pancake and waffle mix kind we normally have) and I wholeheartedly agree. I made up 4 mixes tonight to have on hand.
    These cook up really quick in the waffle iron, and are slightly crunchy on the outside, very soft on the inside. They freeze well; just thaw and stick in the toaster for a minute to reheat.
    The original recipe calls for blueberries, but we didn't have any so I made some plain and some with chocolate chips.
    I wonder if it would work for pancakes as well. Only one way to find out...

    Here is the recipe, from One Hundred Dollars A Month, my new favorite blog.

    Ingredients
    2 cups flour
    1 tablespoon baking powder
    1 teaspoon baking soda
    1/2 teaspoon salt
    1/2 teaspoon cinnamon
    4 eggs
    2 cups buttermilk
    1/2 cup butter, melted
    1 /2 cup fresh or frozen blueberries
    extra blueberries to sprinkle on top
    powered sugar and syrup

    Directions
    Mix the wet ingredients with the dry.  Cook on a lightly greased waffle iron.  Sprinkle fresh berries and  blueberries over the top.

    Tuesday, January 22, 2013

    Our Big Adventure


    This year we are putting in a garden. For real this time.
    We've tried before but for some reason our excuses were bigger than our willpower. Not this year!
    In my commitment to Homemade Goodness, I am determined to grow at least some of our food to can, dehydrate, and of course, eat fresh. Here's what's on the list:

    Heirloom tomatoes
    Potatoes
    Carrots
    Green Beans
    Bell Peppers
    Hot Peppers
    Onions
    Green Onions
    Strawberries
    Spinach
    Lettuce
    Okra
    Pumpkins

    And I'm going to plant an herb garden as well. Contents to be determined later...


    All our seeds come from Baker Creek. They have all Heirloom, non GMO seeds.

    Trash to Treasure: Green Onions


    Did you know you can grow green onions from the bulbs you would normally throw away? I have garlic(on the left) and onions on my windowsill and both are doing very well.  I was pretty skeptical, but today I "harvested" about 1/3 cup, just about what I could buy at the store. I left the stalks in the jar to see how much more I can get from them. I froze the onions in a baby food jar for later.
    I've read that you can cut off the garlic stems just like the onions and use them in place of garlice cloves, or you can plant the cloves in soil, cut off the green tops, and that the clove will use its energy to grow a new head of garlic. Pretty interesting. I will have to get some soil and see if it's true.

    Not bad for free. And they taste great.
    

    Monday, January 21, 2013

    Pizza Dough

    Yesterday was a weird day. My lovely little girl was sick so we and The Babe stayed home while The Husband took the other boys to church. We got Mexican for lunch, and I wasn't sure what to make for dinner since TH had to go into work last night. I knew I wanted to make something from scratch though. I really enjoy cooking now more than before. I love making real food from basically nothing, from just flour and sugar and salt.

    I did a quick google search, "baking from scratch" and found this cute blog.

    Her recipe for pizza dough sounded easy and fast- only about a 30 min rise. I could do that. I ended up using half the dough for our dinner, and freezing the other half. This made a really thin, crispy crust that was so good. I've never been able to make a crispy crust. I was really happy how this turned out.Next time I will press it out instead of using the rolling pin to see how it turns out as a thicker crust.

    *I also baked the crust for about 6 minutes or so before adding sauce and toppings, just to see what would happen. I think that may have helped it to be crispier.

    Never Fail Pizza Dough

    2 cups plain flour
    1 cup of warm water
    1 sachet of instant yeast
    1 teaspoon sugar

    Place yeast and sugar into a large bowl, pour warm water over and allow to sit in a warm place for around half an hour, or until yeast mixture has doubled or tripled in size. Add flour and mix with an electric mixer {dough hook attached} or slowly by hand or until combined and the dough starts to form a ball. Allow dough to rise in the bowl covered with a clean tea towel in a warm spot for around half an hour {more is better}. Scoop dough out onto a well floured bench top and knead into a smooth ball, divide into sections and roll out thinly. Bake at med-high until crust is golden and cheese is melted.
    *I always turn my oven to warm and let the rise happen in there. In our old, drafty house, it's hard to get anything to raise otherwise.